AnyRecover, from iMyFone, is a modern, easy-to-use data recovery tool available for Windows and Mac. It’s feature-rich and supports all the devices we look for in a data recovery tool. As we review the tool, we’ll show you how to use it, what features it offers, and everything else you need to know to get your lost data back.
Supported Devices and File Types
With AnyRecover, you can retrieve data from your computer, hard drive, external disk, SSD, USB drive, micro SD card, memory stick, camcorder, digital camera, music player, video player, zip drive, and more.
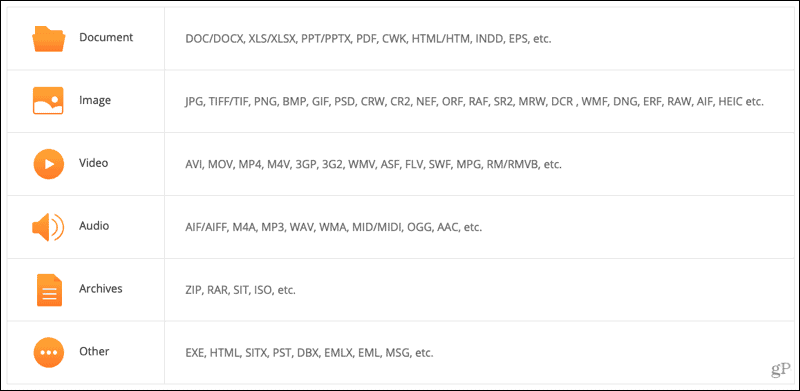
You can recover over 1,000 of the most commonly-used file formats for documents, images, videos, audio files, and archives. So if you have a DOCX document, HEIC image, SWF video, AAC audio file, ZIP archive, or something totally different, AnyRecover can help you retrieve it.
Covered Data Loss Situations
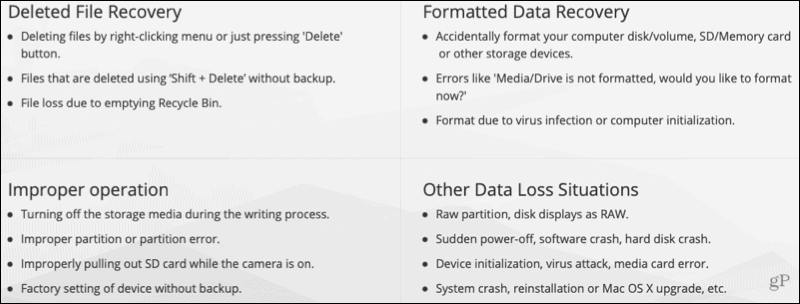
You’re probably wondering if you can recover data from a partition error, computer virus, system crash, or simple file deletion. The answer is yes! With AnyRecover, you can retrieve data from the following kinds of scenarios. Deleted files: From emptying your recycle bin, pressing the delete key, and using Shift + Delete without a backup. Improper operations: By turning off the device during the writing process, improper partitioning or errors, and factory setting of a device without a backup. Format issues: From accidentally formatting a disk or memory card, receiving media or drive formatting errors, and virus infection. Miscellaneous situations: Caused by power outages, media card errors, system crashes, and operating system installation problems.
How to Use AnyRecover
Now that you know the basics of the devices, file types, and data loss scenarios covered, it’s time to show you just how easy it is to use AnyRecover. Open AnyRecover and choose the location containing the data you want to recover. Click to expand a category and select a device or location if necessary. Click Start.
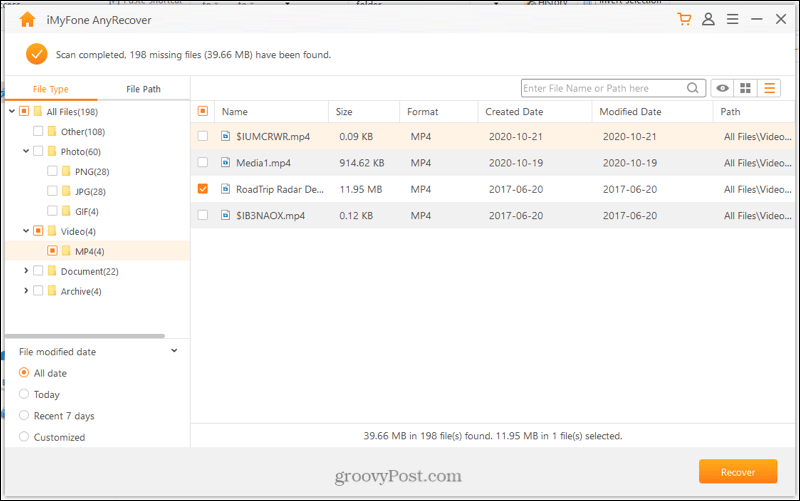
The program will begin a deep scan of the location for files. You’ll see the progress at the top, which only takes a few minutes, and can Pause or Stop it if needed. When the scan completes, you’ll see the total number of files found. You can then double-click to open a folder or use the File Type navigation on the left side. Check the box(es) for the file(s) you want to retrieve and click Recover.
Choose a location to save the recovered file(s) and click OK.
And that’s all there is to it! Navigate to where you saved the recovered files, open them up, and feel that relief.
Search, Sort, Filter, and Preview Files
While you can easily recover a file in just a few steps, you might be in search of a particular one. With AnyRecover, you have options to search, sort, and filter within the tool. Then, see a preview to make sure it’s the file you want. Search: Enter the file name, part of it, or the path into the Search box and hit the button. A separate window pops open with your results and an option to Recover the file. Sort: Click a column header to sort alphabetically, chronologically, or by size. Filter: Use the File Modified Date section on the left to find files by date. Choose from All dates, Today, Recent 7 days, or Customized. If you pick Customized, you can enter any date range you like. Preview: Double-click a file or select it and click the Preview button. You can even hit Recover directly from the Preview window. You can also switch between list and icon view to make finding the file you want faster. These buttons appear at the top to the right of the Search box.
Miscellaneous AnyRecover Settings and Options
As you can see, AnyRecover is an intuitive data recovery tool. So you don’t have to worry about a bunch of unnecessary settings. But you do have a few things that you might want to check out.
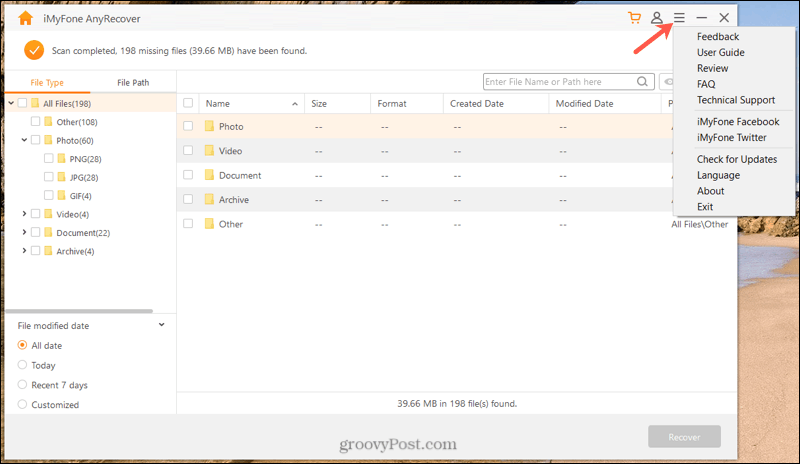
Next to the Menu button, click the contact icon to enter your licensed email address and registration code after the trial period.
Why Choose AnyRecover?
If the ease-of-use, reliability, and helpful features aren’t enough, AnyRecover offers a free trial! This terrific option lets you can scan, preview, and recover a limited number of files at no charge. So, if you’re not confident that AnyRecover does what it claims, see for yourself and put it to the test. After the trial, you can subscribe to a monthly, yearly, or lifetime plan. Prices start at just $49.95 for Windows and $59.95 for Mac. A subscription gives you unlimited data recovery, free lifetime updates, professional support, and a 30-day money-back guarantee. Additionally, in speaking with AnyRecover during our review, they confirmed that flexible licensing options are available for business customers. Bonus: The AnyRecover website offers a host of helpful how-to articles. Need help with a corrupted PDF, Outlook repair, or BitLocker drive? You’ll find a great selection of useful tutorials tailored to both common and one-off data recovery situations. Read more about the company behind AnyRecover, its history, product reviews, mission, and more.
Ongoing Data Recovery and Peace of Mind With AnyRecover
There is nothing quite like losing a sentimental photo, crucial business document, or priceless video. Using AnyRecover, you can not only get these types of items back but have peace of mind with a rescue tool for future data loss situations. It’s like an insurance policy for your photos, documents, videos, and other important files. Remember, you never know when an incident causing you to lose data will occur. Be prepared with AnyRecover. This article was sponsored by iMyFone, the makers of AnyRecover
![]()
