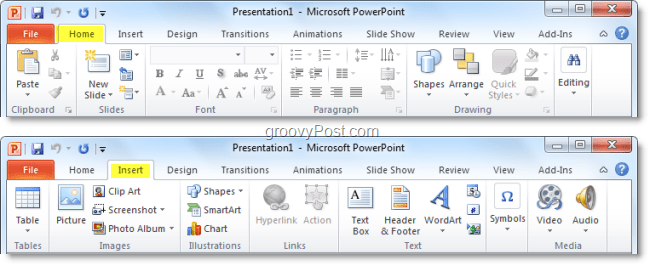
ANYWAY, the style was apparently successful enough because with the launch of Office 2010, Microsoft continued down the path of the Ribbon, although adding just a few adjustments. For example, the File button is BACK (thank god) so people shouldn’t be looking for the PRINT button anymore!!! HOORAY!!! For me personally, I like the Ribbon. It allows you to quickly navigate through various commands in Office and everything is just more logical. That being said, one of the biggest complaints in the 2007 version was that it was too hard to find everything. With Office 2010, I think “out-of-the-box” will be significantly improved just with the FILE button alone. However, even better news is that with Office 2010 it’s now much easier to fully customize the Ribbon to make it just the way you like it. Let’s take a look! By default, the layout of the Office 2010 ribbon is already cleaner and more organized than it was back in 2007. As already mentioned, the File tab on the far left gives you all the older legacy commands your used to from all windows apps (Save, Print, Share, etc.) Also, the Home tab has all of the formatting options you could possible need, as well as a few extra menu items. Further down the ribbon, each subsequent tab contains appropriately organized actions and commands.
Sometimes however you might find yourself using a single command from the Design tab but then 90% of the rest of the time you’re on the Home tab. You can save yourself valuable time by swapping the commands around, or you can just create a whole New Ribbon with everything you need in it. Here’s how: How To Customize The Office 2010 Ribbon
- From an Office 2010 application (Word, Excel, Outlook, etc.) Click File and then Select Options. Note: In this example, I’ll be using PowerPoint so there may be a slight variation if you are using Word 2010 or some other Office 2010 app.
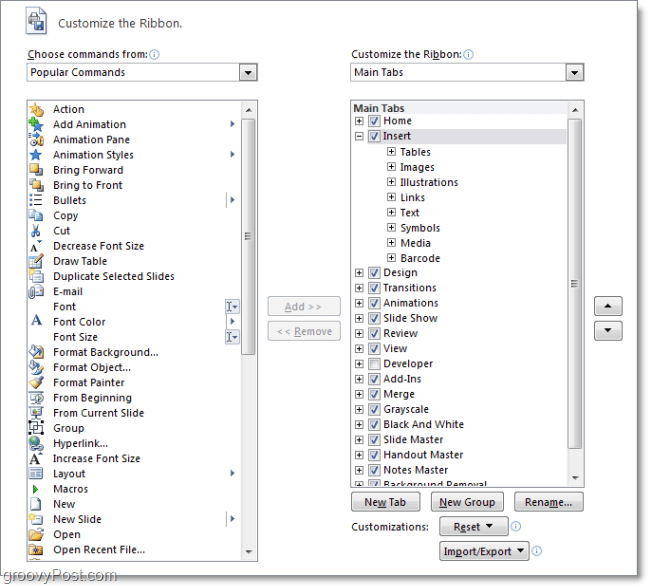
2. In the Options menu Click Customize Ribbon.
3. The customization window. The new Ribbon is super customizable. Here are some of the things you can do here:
Add commands to a group.Change which tabs appear in what order.Add new tabs.Make new groups inside of a tab.Change the order in which tab groups appear.
Although some of these actions are relatively self-explanatory, we’ll do a brief introduction to get started on it.
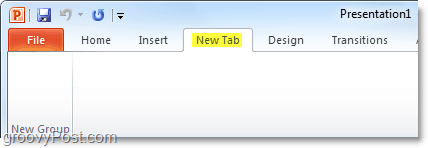
4. A good first step in making a custom ribbon is creating a New Tab. Click the New Tab button to do this.
4.b If you leave this tab blank as it is, you’ll see it’s presence reflected in the ribbon immediately, it will just be empty.
5. Next, let’s add some commands. On the Right-Pane in the options menu, Click the Group that is under the Tab you just created. Once you’ve done that, then Choose an action from the left column and Click Add.
6. It’s a good idea to organize using multiple Groups within tabs, so Click New Group button from the Right Panel. To keep things organized and avoid confusion, also be sure to Rename groups and tabs.
7. The rename window has an assortment icons to choose from, pick whichever you like best and then Type in a name and Click OK.
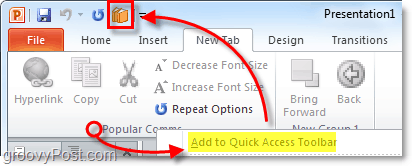
7.b If later on, you find yourself wondering “What is the icon for tabs and groups in the Office 2010 Ribbon for?” here is the answer. When you add the particular group to the Quick Access Toolbar, it will show the icon there. (Located at the top left of your Office application Window)
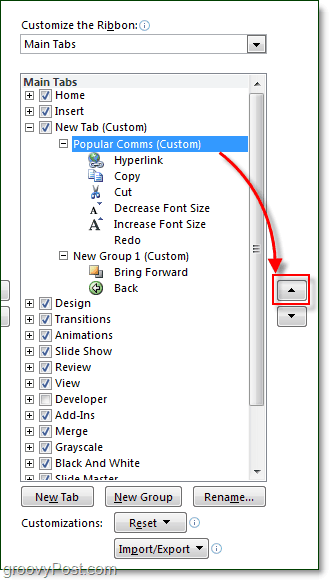
8. Now that we’ve got some content in the new ribbon tab let’s move things around. Select the Tab or Group and then use the arrows on the side of the box to move them up or down.
That just about sums up ribbon customization. Of course, now that you know how to create your ribbons, you can always go in and edit the pre-made ribbons available in Office 2010 making the built-in ribbons even more helpful and user-friendly!
Comment Name * Email *
Δ Save my name and email and send me emails as new comments are made to this post.

