If you’re working on long documents, then you’ll probably want to number your pages to keep them in order. The good news is that this is quite simple to do in Google Docs, although you may need to tweak things a little to get the page numbers exactly where you want them. If you want to add page numbers to a Google Docs document, here’s what you’ll need to do.
Add Page Numbers to Google Docs
Google Docs offers default formatting for page numbers. If you’re happy to use these, adding them to your document is an easy process. To do this, open your Google Docs document. Click Insert in the menu bar, then hover over the Page numbers menu.
You can then choose from one of four available options shown here.
The top-left option puts your page numbers in the top right-hand corner of the page, starting from the very first page. The bottom-left option puts your page numbers in the bottom right-hand corner of the page, starting from the very first page. The top-right option puts the numbers in the top right-hand corner, but skips the first page, with numbering starting from the second page onwards. The second page of your document is numbered as page one, the third page as page two, and so on. This is ideal if you have a document that has a title page that you don’t want to include in the page numbering. The bottom-right option also skips the first page but puts the page numbers in the bottom right-hand corner instead. Select the option you’re happy with to add them to your document—your document will be updated immediately.
Move Page Numbers to a Different Position
By default, Google Docs only allows you to put your page numbers at the top right or bottom right of each page. It’s possible to add page numbers on the left or in the center, but you’ll need to tweak your settings to do this. To start, use the method above to add page numbers to your document. Make sure to pick one of the bottom two options if you want the numbers at the bottom of the page, or the top two if you want them at the top. Once you’ve done this, double-click to begin editing the header or footer, depending on where your page numbers have been inserted.
This will open the header or footer editing menu. Select your page number here.
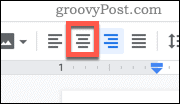
To place your page numbers centrally, click the Center align icon.
To place them to the left of the page, click the Left align icon instead.
Your page numbers will now move to the position you’ve specified. If your first page number changes, but the others don’t, make sure that you have the Different first page option unchecked.
Skip the First Page
If you want to include the first page in your page count, but hide the page number from your document, you can do this with a tweak to your document settings. To start, click Insert in the menu bar, then hover over the Page numbers menu.
Select the More options option.
To skip the first page in the way described above, uncheck the Show on first page option, then click Apply to confirm.
Your pages will now be numbered from page two onwards.
More Google Docs Formatting Tricks
There are plenty more formatting tricks you can try to improve your Google Docs documents. For example, you could create different styles of documents by changing the margins in Google Docs or by adding two columns in your document. If you’re creating an academic document, you may want to double space your text, depending on your academic style guide. The more you know, the easier it will be to create documents exactly as you want them in Google Docs.
![]()


