Change Font Size and Style in Microsoft Word
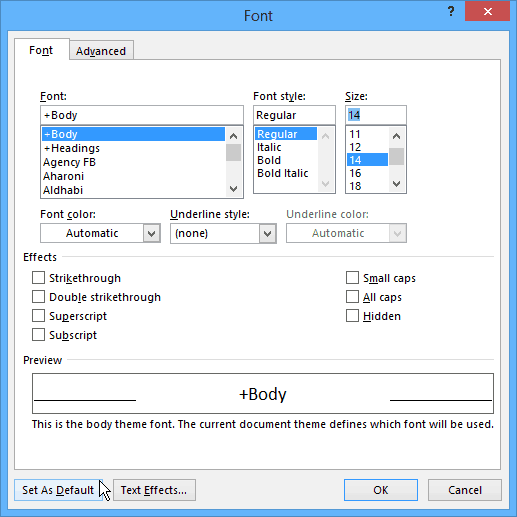
First, launch Word in Microsoft Office 2013 or 2016 and use the keyboard shortcut Ctrl+Shift+F to open the Font dialog box shown below. Here is where you can change the default font style, size, effects, and even the color if you want. After you choose your settings, make sure to click the Set As Default button in the lower left corner. If you only click OK, it will change the font for this document only.
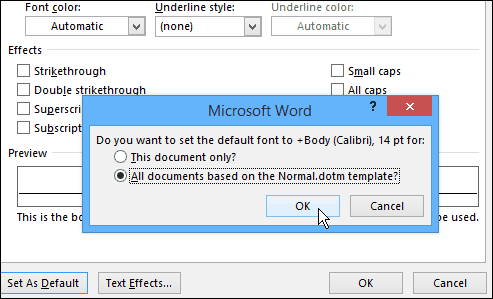
After making your selections you’ll get a confirmation dialog box where you want to select “All documents based on the Normal template” and click OK.
Now every time you open a document, the default font size and style will be exactly what you set it to. It’s worth noting that you can use the same steps in Office 2010, too. Unlike changing the Office color theme, which changes all of the apps in the Office suite, you need to change the default font in each app individually. For example, here’s how to change the default Outlook 2010 font. Thank You again for any help. Gibert Wish there were a way to just switch the font but not the size and substitute Arial for Calibri 11 and let the fonts sizes in Word for Normal and Headings to have the same font size spec as Calibri. That would be the hot setup. I don’t understand why MS has to make this so difficult? Should be an easy and basic adjustment unless some complications under the covers makes it more difficult than I think. A simple way to correct the problem is as follows: – highlight a line in the text document – select FONT(Shift+Control+F) – Change to font as desired and click OK (NOT ‘set as default’) -Click back to the text -Highlight the altered text and select FONT again -Select “set as default” The above two-step operation worked for me. Regards, Jack Comment Name * Email *
Δ Save my name and email and send me emails as new comments are made to this post.
![]()


